
Superglue, CA, or more properly CYANOACRYLATE type glues - as modelers we definelty have a love/hate relationship with them. We love to use them, but hate getting our fingers - or worse - glue to whatever we originally planned to stick together. In this short article, I hope to give you a couple of tricks to make your supergluing experience a bit easier . As is usual, most of these tips were given to me by other modelers, and I am just assembling them for your use.
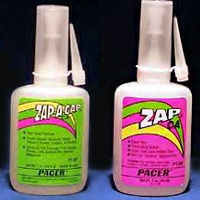
I like to use the ZAP line of glues, available from Pacer Industries. If you would like to see their website, you can view it by clicking here. There are other brands available in hobby stores; Hot Stuff in popular, as are a line of glues typically marketed under the house brand of larger hobby stores and suppliers. For projects that require a lot of glue, like framing up a plug, I will often purchase cheaper bulk alternatives , but for details, I stick with Zap.
Superglue has a shelf life, after which it will thicken and become useless. I have found that to be between 6 months and a year, so I tend to purchase smaller bottles these days (and throw less away). The hotter the ambient temperature the shorter the shelf life.
To extend the life of an unopened bottle, keep it in your refrigerator.
Acetone will clean up superglue, and debond it. It is toxic, so be sure to use common sense and proper ventilation. Read warning labels on products, and follow them. Acetone will attack paint and many plastics, so keep that in mind when working with it.
Fingernail polish remover will also work, and is easier on the skin. Does take a bit longer though.
For very thin superglue, I use the nylon tubing that Zap sells, in addition to their "Z-ends". This takes care of about 90% of my application needs. For applying a very small amount precisely, I have made a tool from the eye end of a sewing needle.
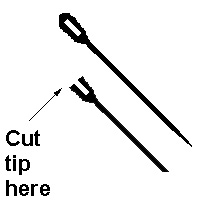
Superglue applicator from a sewing needle
To make it, simply grind or sand the eye becomes a "U" Then take some very fine sandpaper (600 grit or better) and ease all the edges. To use, place a small amount of superglue in a plastic container - the top of a film canister works well - and dip the "U" end in. It will retain a small amount of the glue, but will transfer readily from there to the surface you wish to apply it to. You can control the amount by the size of the original sewing needle. When the needle gets clogged a soaking in a jar of acetone will clean it up nicely.
Another useful applicator is the tip of a nice round toothpick. Dip it in to thin CA, and let it kick off. Then you can use it as an applicator.
Remember, the number one rule of superglue is to use it sparingly. Too much, and it will not want to kick without accelerator, which can be messy (and the new types can be destructive to both plastic and paint). If you do use too much...
Beyond their obvious uses, paper towels are great to correct a mistake with superglue, and to speed the setting of the joint. Take a nice, absorbent paper towel, and tear it so the edge is rough and fibrous. Keep this hand as you apply your glue, and then quickly touch the edge to the joint; just for a moment. The towel will wick up excess glue, both improving the appearance of it and letting the glue set faster.
Also known as kickers, these will cause the glue to set off very quickly, almost violently. They will also cause the glue to expand a lot, causing a whitish bloom around the joint. If used near clear plastic, they will fog the inside. As I mentioned above, these accelerators are tough on most paints, and some types will soften the surface of styrene as well.
For small cracks, the thicker superglues work well. For a larger fill, try putting some baking soda in, and then drop or two of thin CA. It will kick very rapidly, and be very easy to sand, at least in the short term.
Mike Oakes adds...
For fixing plastic or holes in plastic.
Place some tape on the back side of the hole, fill the hole with superglue, then generously sprinkle baking soda over the glue and blow off the excess. You are now ready to sand it, drill it paint it or anything else you need. Bond very fast and strong.
If you have a joint that needs more strength than superglue alone can give, try using a piece of light fiberglass cloth in conjunction with the glue. Lay the cloth in place, and then apply thin glue on top, while pressing it in place with the tip of a toothpick. The end result is very, very strong.
You can also use backing soda or acrylic nail powerder to add bulk and strength to a superglue joint.
If you need to quickly seal a small wood project, say before applying a coat of primer, thin superglue rubbed in with a paper towel will do a nice job. Be sure to keep the towel moving, or it will stick and cause a mess. Some practice is helpful with this technique, before attempting to refinish that family heirloom!
Send them to me and I will post them, along with your name if you like. You can email me here.

Back to Construction Articles
623
Version 2.0 4-19-20